|
Mounting
to Other Tracks
The "C" Clamps need to
be reasonably tight so the the "T" Mount does not readily rotate.
While the BestTrack makes everything easy, other tracks require a bit of thought.
First, lay out all your component locations carefully, expecially if you are
using a remote control start gate. Be certain everything fits before drilling
any holes.
Wood Tracks
Typical wood tracks have a deck of
plywood about 1/2" thick. A short self-tapping wood screw may work a few
times, However, over many setups, the wood tends to get weak, and eventually
fails.
Two better solutions:
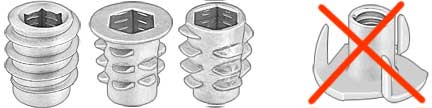
1. A steel threaded tapping insert
is designed for this exact situation, and readily available in a number of styles.
| Inserts
are usually installed with an Allen Wrench. Insert it from the top side of your
track to get the full strength. Avoid "T" Nuts that you bang in with
a hammer, as these make an unsightly job. |
|
2. Use screws and nuts. Drill all
the way through the track, and choose the appropriate screw length. Avoid locating
the holes on the track's running surface. Locate your screw holes accurately
on the track guide centers for good workmanship appearance. Countersink the
holes, and choose flathead screws. The clamps accept #10 screws, but can easily
be drilled out for 1/4" screws. At the time of your order, let us know
about your track details, and we can supply appropriate hardware.
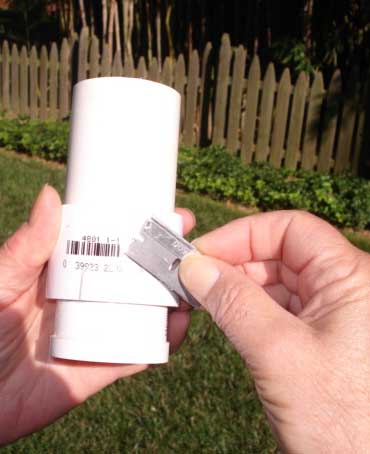
| When locating the holes for the
"C" clamps, first snap in the "T" Mount, which will expand
the clamp slightly. The correct hole center distance is 1 and 15/16". |
Microwizard Freedom Track
|
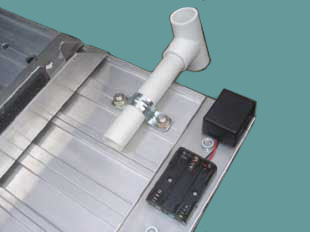
For the aluminum Microwizard Freedom
track, the "T" mount is held by only one "C" Clamp with
either #10 or 1/4" -20 screws (your choice) passed through the track. The
geometry of the track and the stiffness of the mount makes this a solid solution.
We supply the battery case and the
Control Unit wired together. They have double-sided 3M foam tape already installed
on the bottom sides. Simply peel off the wax paper, and press in place on the
top cross member as shown. Nothing is faster to set up than the Microwizard
version.
|
|
Plastic Tracks
|
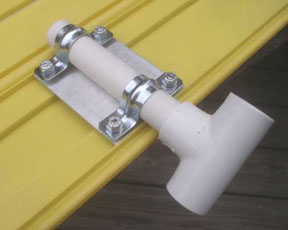
SuperTrack and DerbyMagic are two
popular plastic tracks. The material is fairly light weight, and we don't recommend
using screws to mount the LT4. Instead, we offer an aluminum plate with four
studs which hold the "C" Clamps with nylon filled nuts. Sold separately,
$24
The assembly is permanently attached
to the track bottom using VHB (very high bonding) double sided tape. This is
what the DerbyMagic attachment looks like. A similar solution is available for
the SuperTimer track.
For mounting the PCU to either track's
bottom, just use widely available 3M double-sided foam tape. We recommend removal
of the PCU after your derby to avoid damage.
|
|
|